Connect Google Ads Conversion Tracking to cPixel
How do I connect Google Ads to cPixel?
In Google Ads, create a purchase conversion action for your website under Goals, Conversions, choosing Manually with code, then read its Conversion ID and Conversion label from the Use Google Tag Manager tab. Paste both into cPixel, which fires the conversion from Shopify’s Thank you page. cPixel has no server connection to Google Ads.
Paste them into cPixel
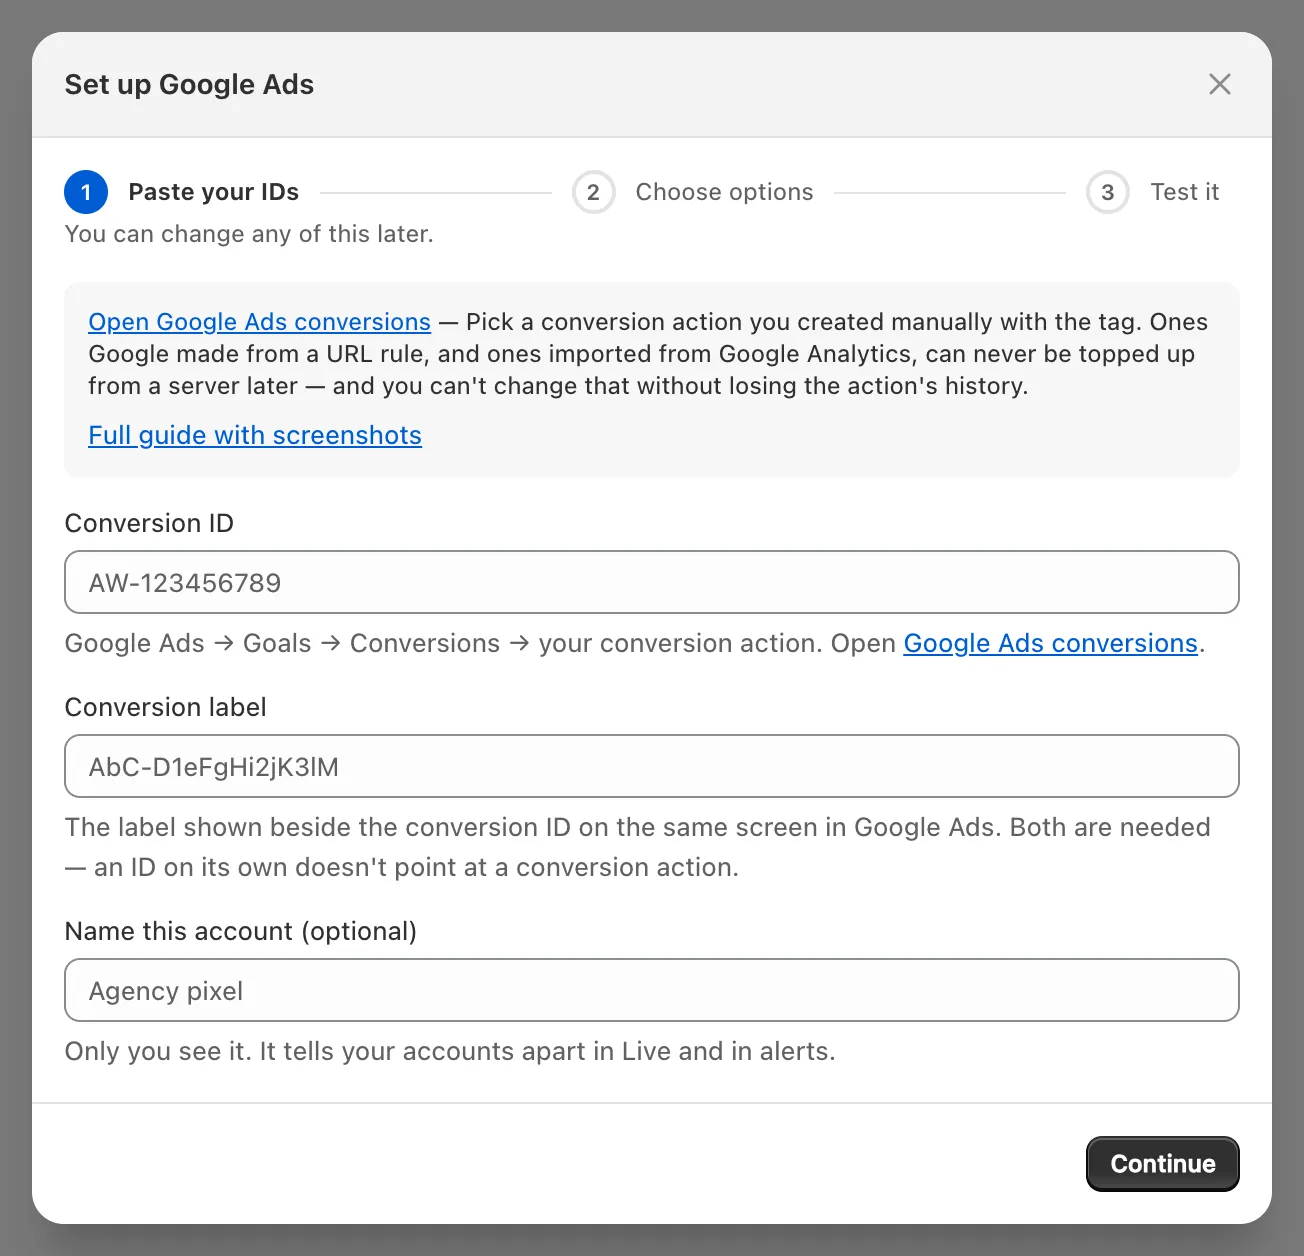
- In cPixel, open Destinations and click the Google Ads icon under Connect a platform. Set up Google Ads opens on Paste your IDs.
- Type
AW-and the Conversion ID’s digits into Conversion ID, and paste the label into Conversion label. Both are needed: an ID on its own doesn’t point at a conversion action. Google Ads has no token, test event code or Test connection. - Name the account under Name this account (optional) if you like, then click Continue.
- On Choose options, keep Send events from the browser ticked. The Server-side sending panel reads Browser-side: conversions go from the shopper’s browser, ad blockers will cost you some, and there is nothing for cPixel to resend them from.
- Keep No — cPixel handles Google Ads (recommended) unless another tool fires this purchase action (see below): despite its label, Yes — keep it, and cPixel stops sending Google Ads server-side stops cPixel’s Google Ads tag for this account; there are no server sends.
- Click Save and continue. Test it confirms Google Ads is connected; its line about server-side purchases doesn’t apply here.
How do I create the right conversion action?
Create a website conversion action in the Purchase category, measured Manually with code. Google’s own guide: Set up your web conversions.
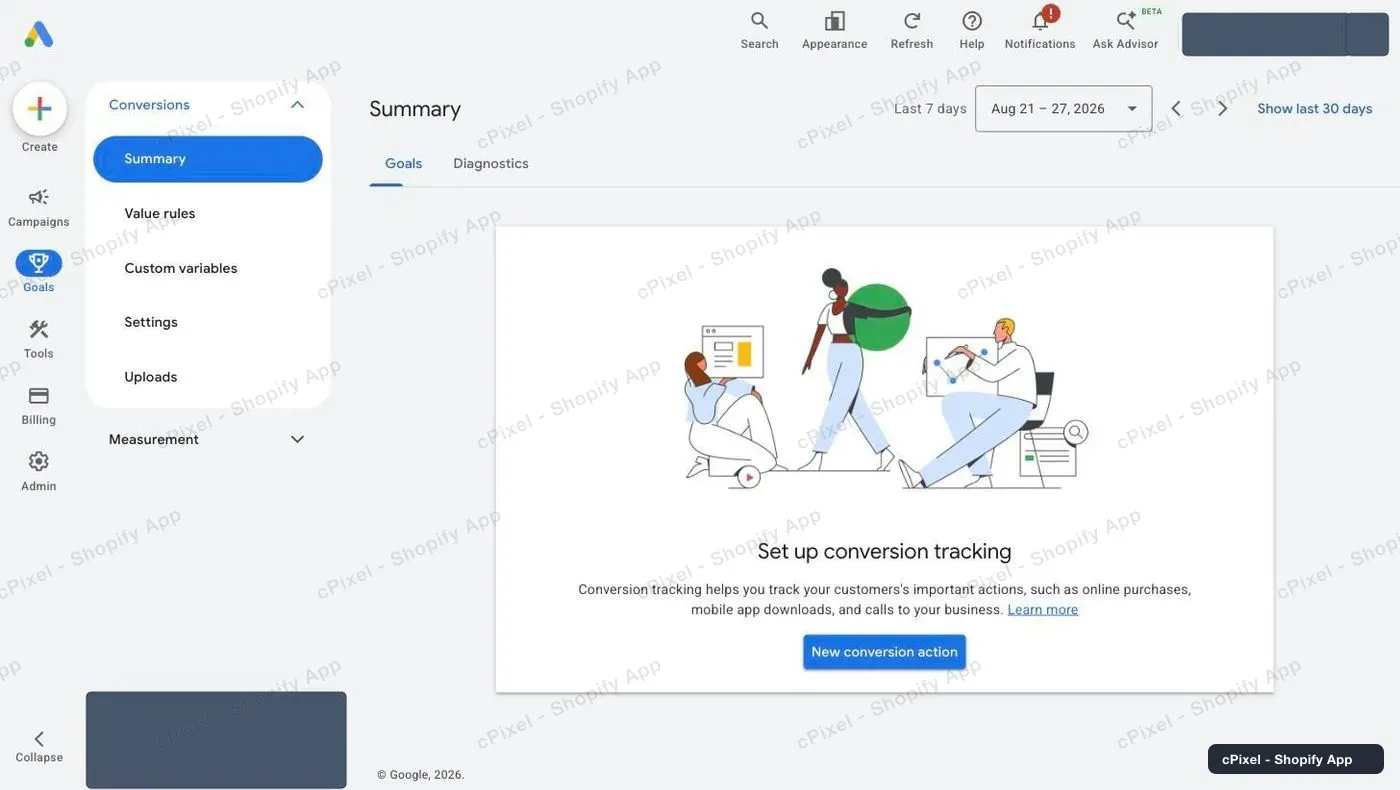
In Google Ads, open Goals → Conversions → Summary and click New conversion action (Google’s guide says + Create conversion action).
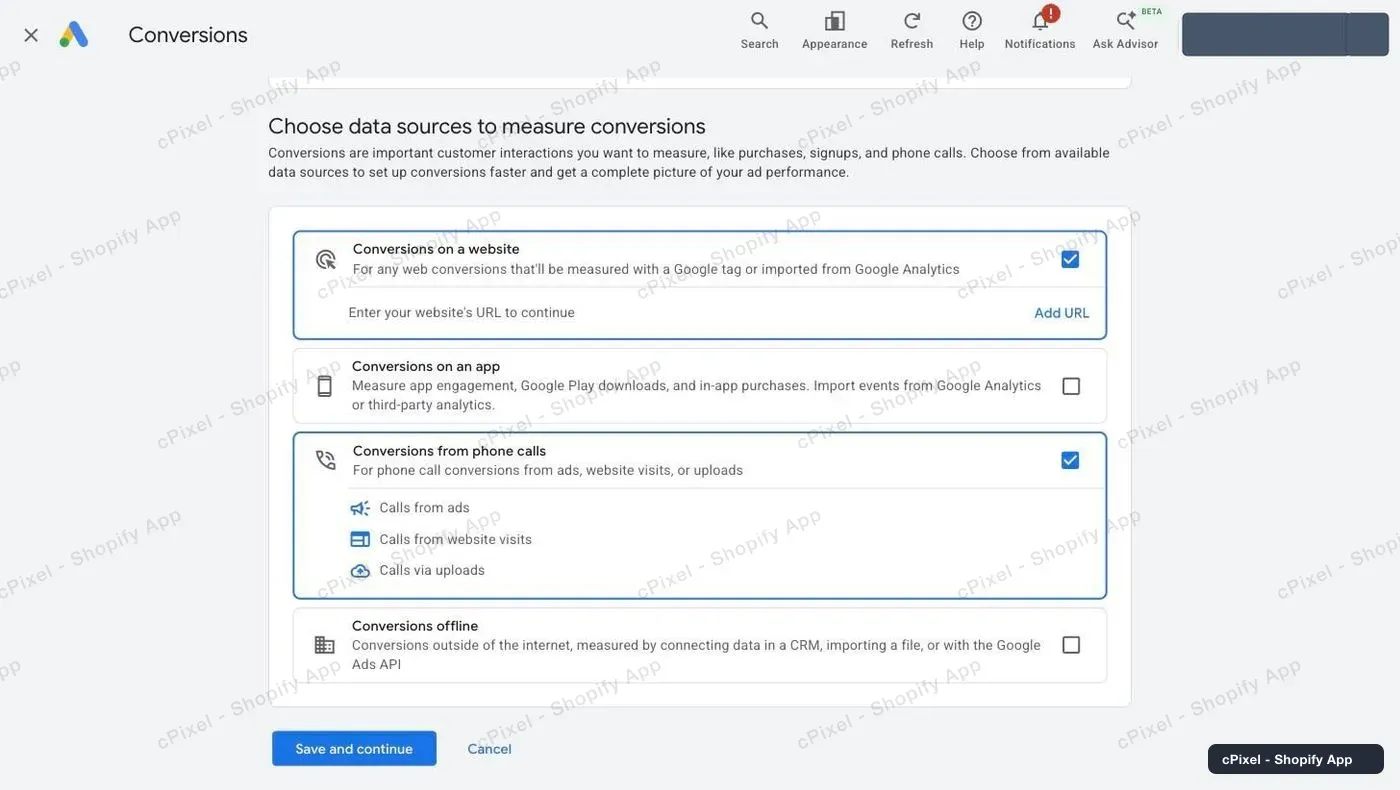
On Choose data sources to measure conversions, keep Conversions on a website ticked and untick Conversions from phone calls, which Google ticks for you. Click Add URL on the website row.
Enter your store’s domain (the
.myshopify.comaddress works) and click Scan. Tick Google tag: “Not installed yet” is expected, because cPixel sends the conversion without Google’s tag on your pages. Leave any offer to link Google Analytics alone and click Done.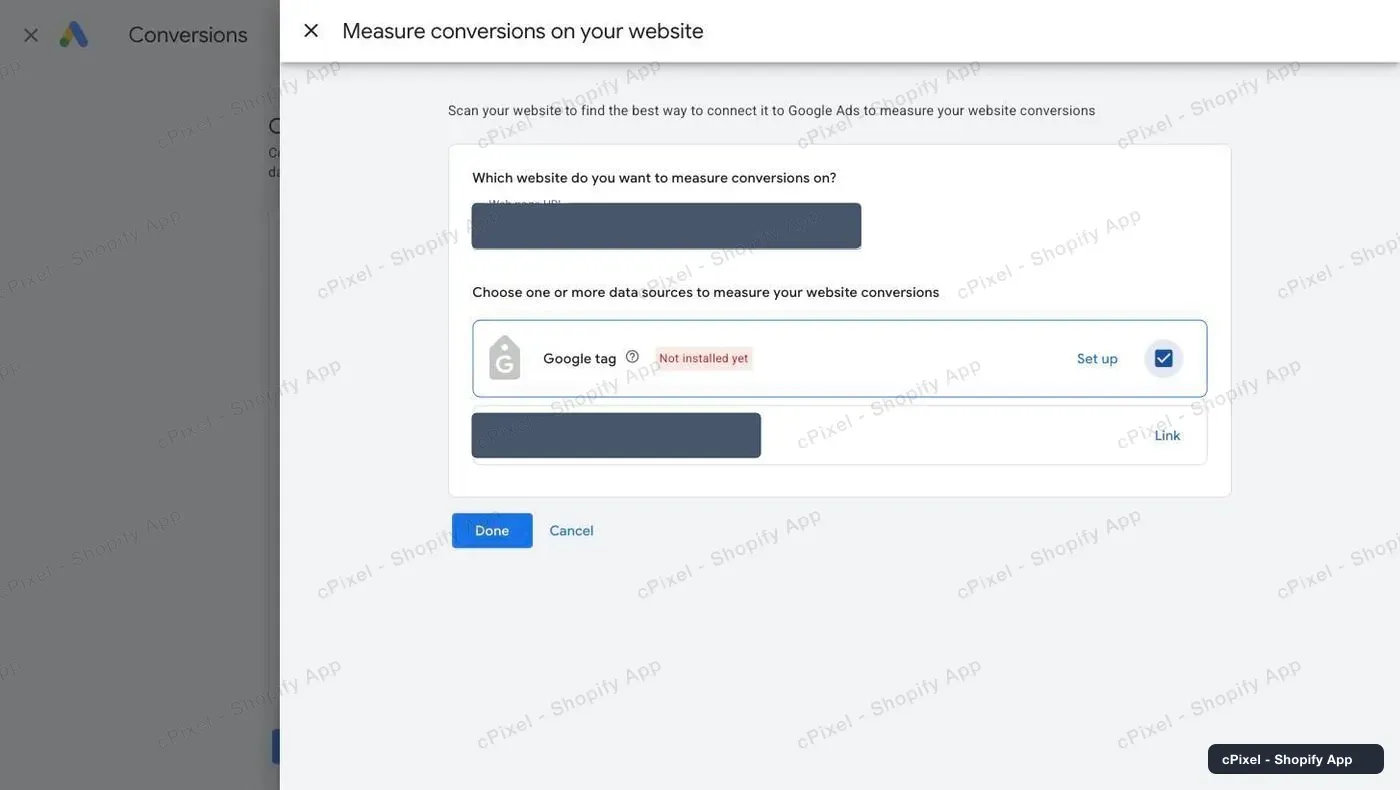
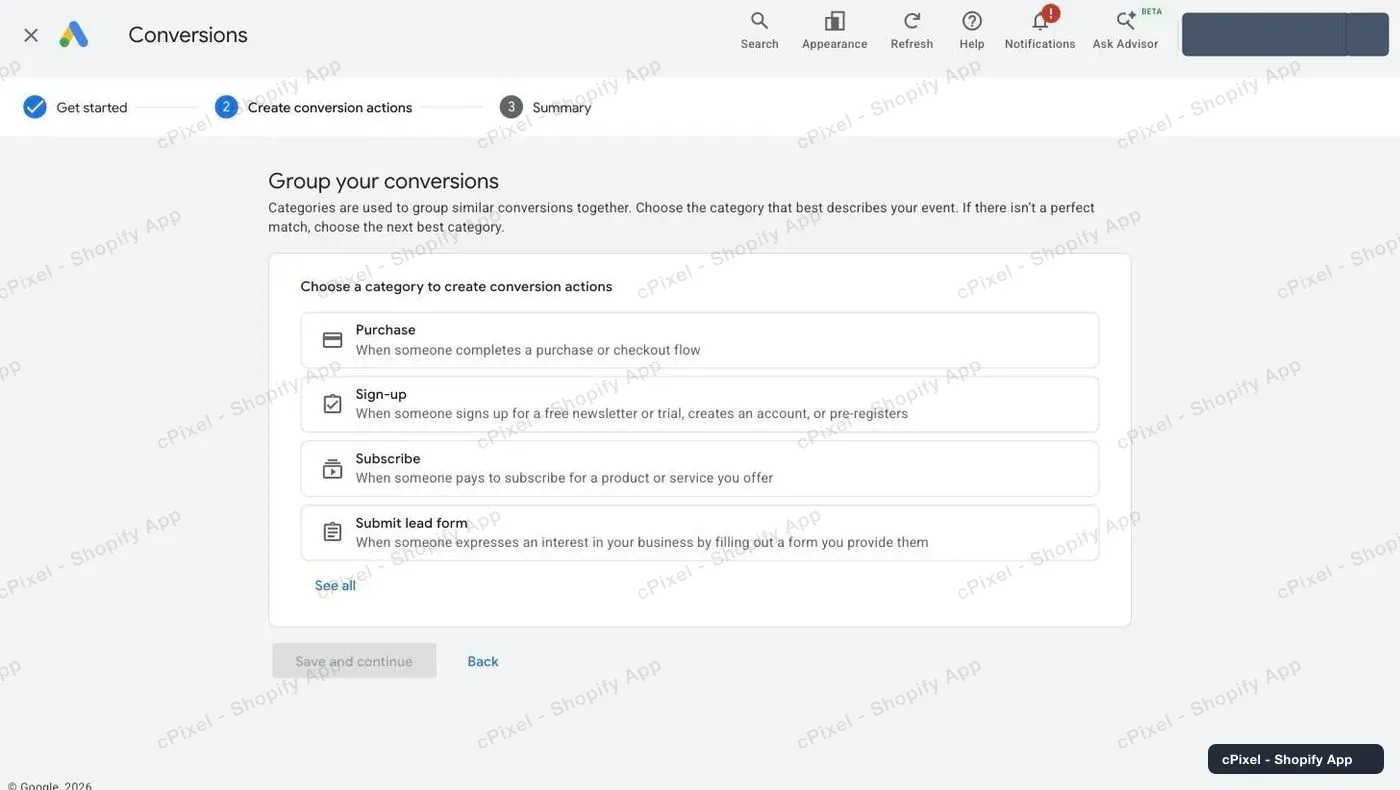
Choose Purchase, “When someone completes a purchase or checkout flow”; cPixel fires this action on purchases only.
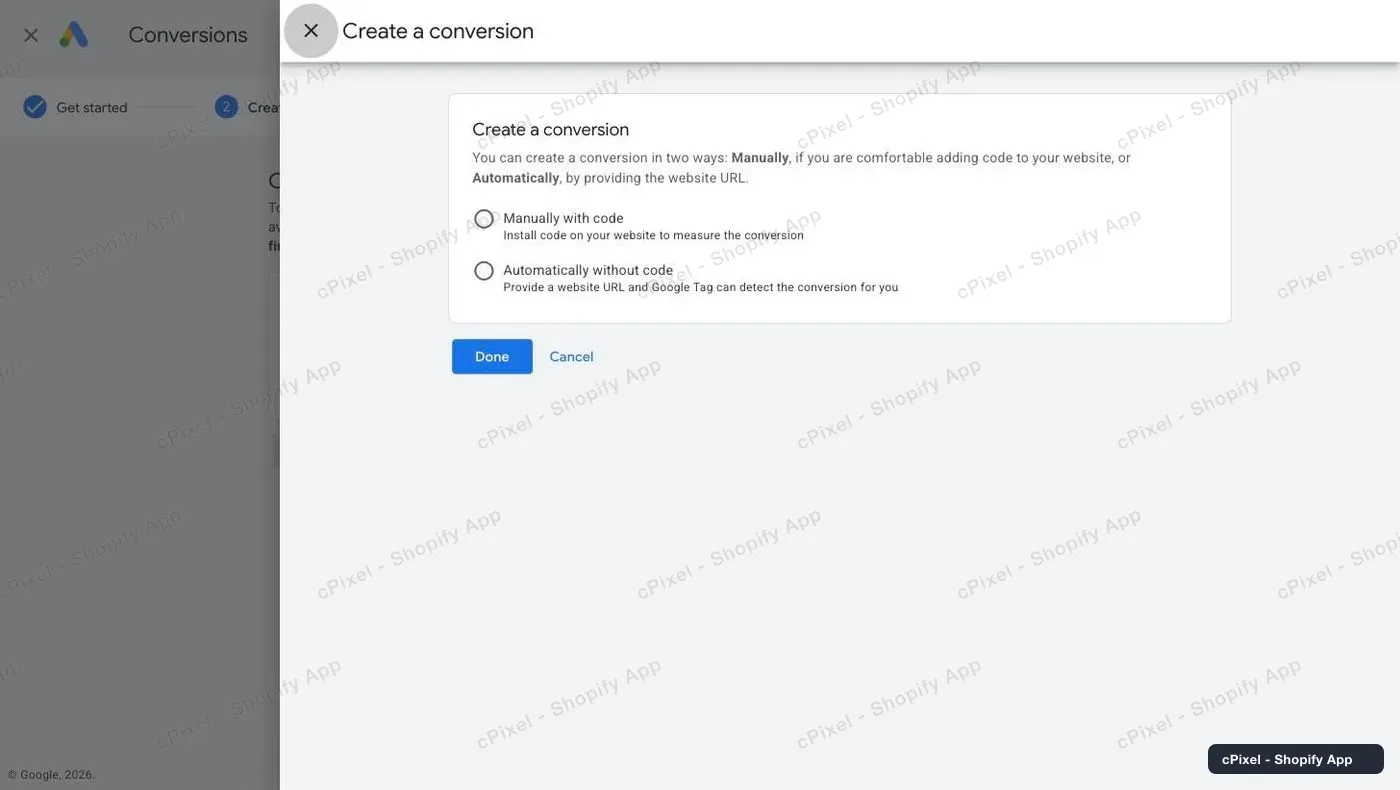
Choose Manually with code, which Google’s guide calls “Manually using code”, then click Done and finish Google’s steps.
Note: Google’s last step may switch on enhanced conversions, which supplements a conversion with hashed customer data, such as email, sent from your website (Google). cPixel’s tag sends no hashed email, phone or address, so enhanced conversions gets nothing from cPixel either way.
Why does “Manually with code” matter?
It’s the only kind of action a server connection could ever top up, and switching later means a new action, without the old one’s history.
Google’s API takes server-sent data only for conversions recorded by a regular conversion tracking tag, not Google Analytics imports (Google), and an action built from a URL rule can’t take enhanced conversions (Google). cPixel has no server connection to Google Ads; this keeps the option open.
Nor is there a key to collect: Google’s conversion API takes no API keys, only a Google sign-in (OAuth) or a service account in a Google Cloud project (Google). A setup asking you to create that project hands you developer work. Your Customer ID, top right in Google Ads, identifies the account and authenticates nothing.
Where do I find the Conversion ID and label?
In the conversion action’s Tag setup, on the Use Google Tag Manager tab, which lists Conversion name, Conversion label and Conversion ID as a table.
- In Goals → Conversions → Summary, click your Purchase action.
- Under Tag setup, click Use Google Tag Manager. On some accounts a Manage link beside the data source opens it.
- Copy both values. The ID shows as digits, so type
AW-before it in cPixel. The label is about 20 letters, digits, dashes and underscores.
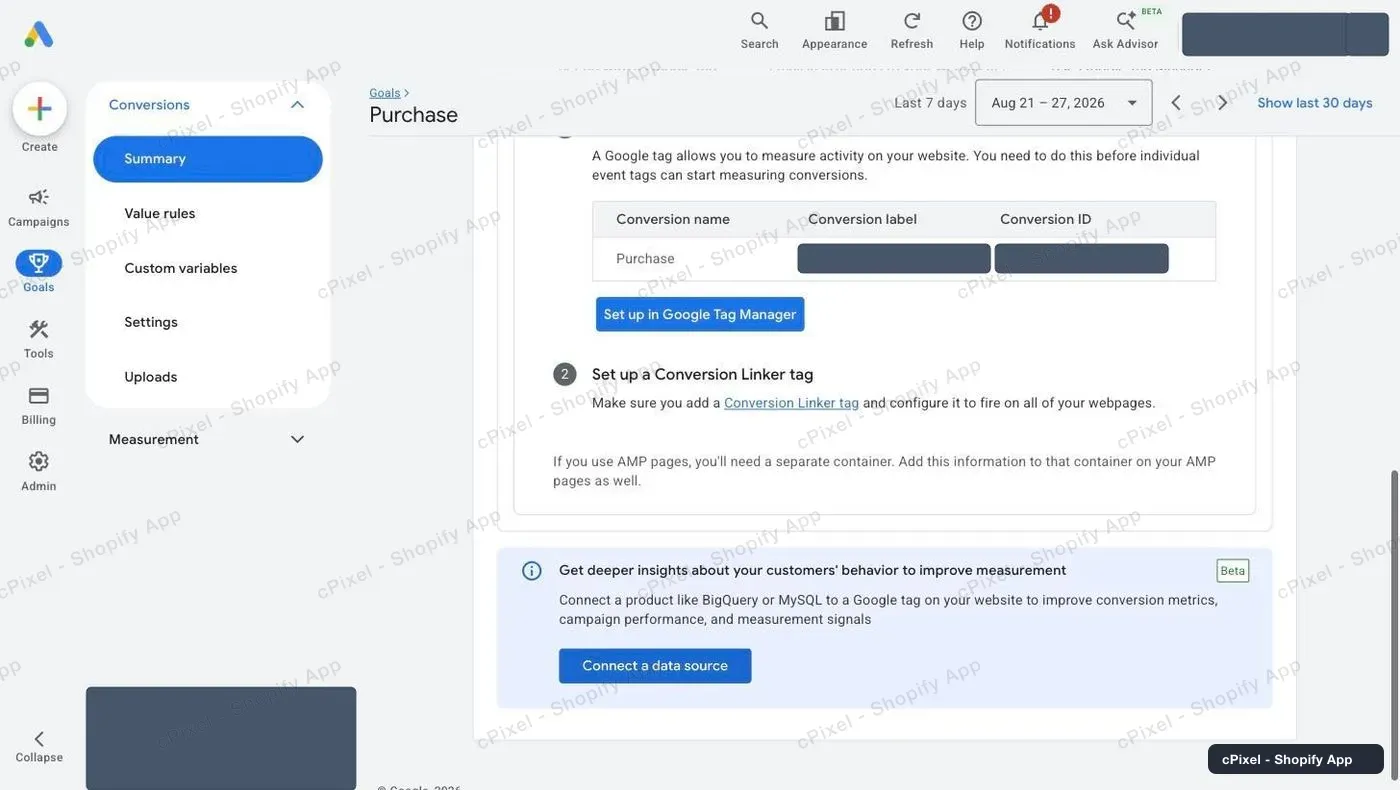
Google says the Conversion ID is unique per account and the label per conversion action (Google), so the label is what points cPixel at your Purchase action.
What does cPixel send to Google Ads?
One conversion per purchase, from the shopper’s browser, when Shopify’s Thank you page loads. It runs in Shopify’s web pixel, so it needs no app embed and no code on your Thank you page, and it fires only with the shopper’s marketing consent.
It carries the order’s value, currency and order ID, Google’s click ID (gclid, gbraid or wbraid) when the shopper came from an ad, and no hashed customer data. Nothing goes from cPixel’s servers: no refunds, retries or resends. The tag never counts against your plan’s allowance, as the Plan page notes when Google Ads is all you’ve connected (pricing).
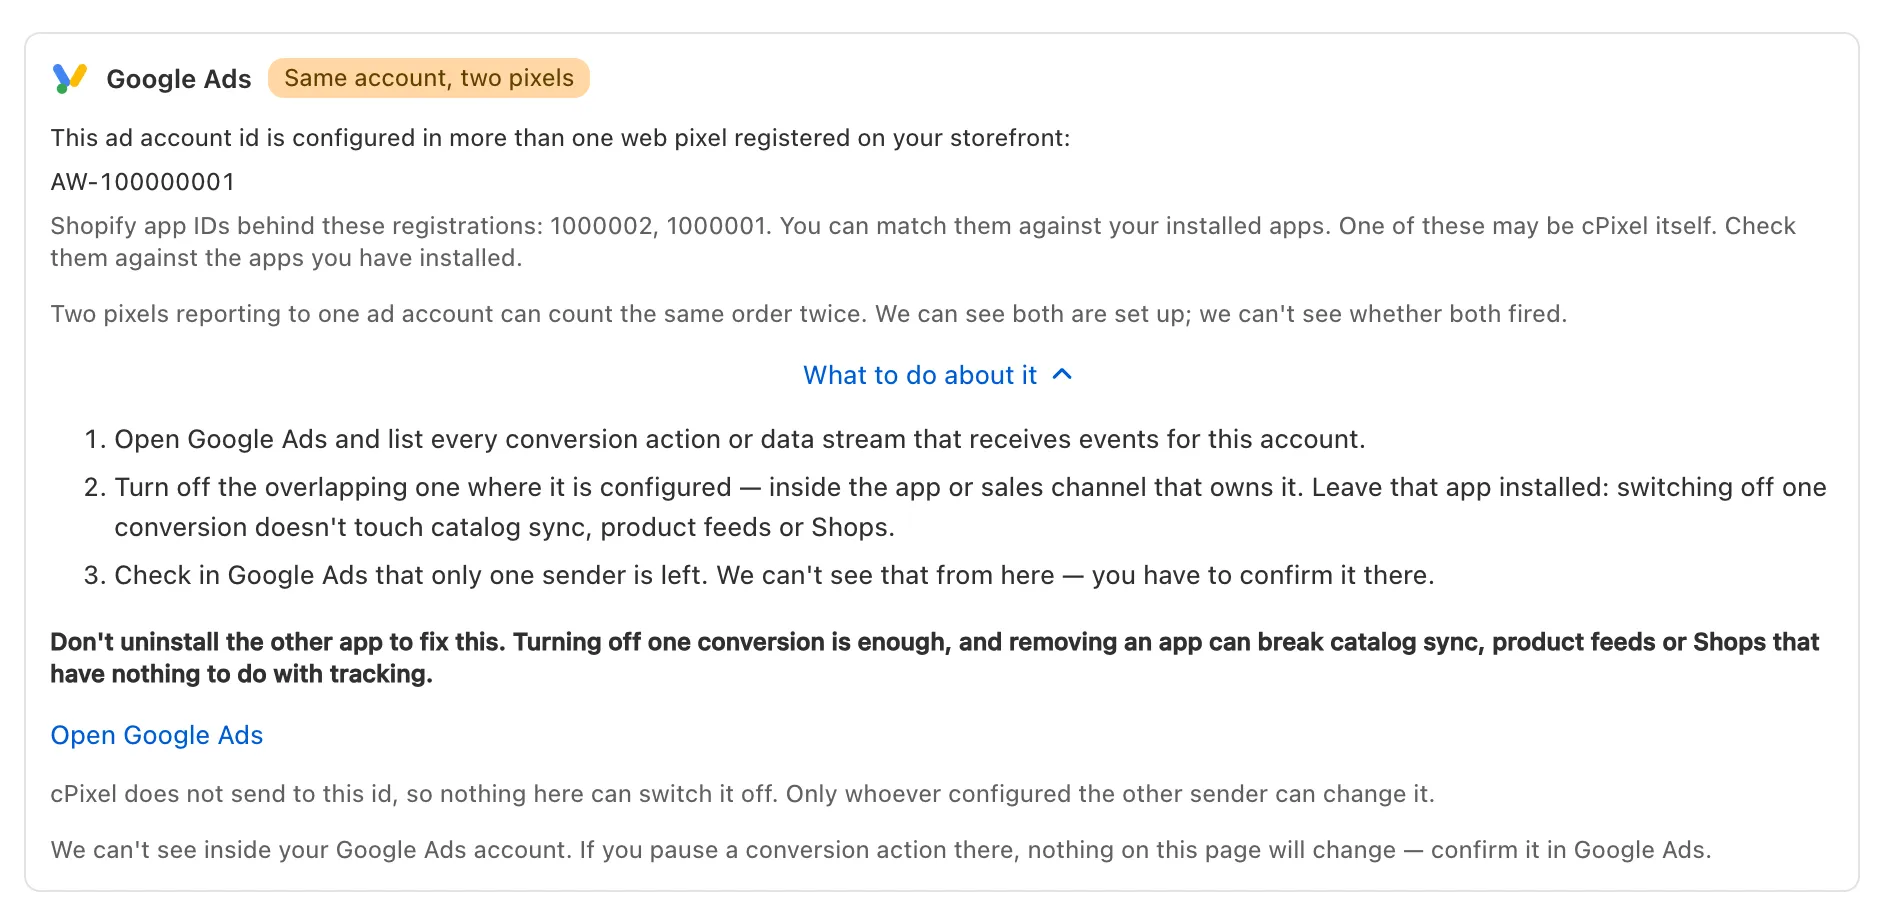
Important: Google says linking Google Ads in Shopify’s Google & YouTube app sets up its own purchase, add to cart and checkout started actions as account defaults (Google). With cPixel’s Purchase action counting too, each sale counts twice: keep one sender per action (one sender per pixel). cPixel’s daily scan flags an
AW-ID set up in more than one pixel:
How do I check it worked?
Place an order with a Live session running: the purchase’s Browser row names Google Ads. That proves cPixel fired the tag, not that Google counted a conversion.
- In cPixel, open Live, click Start session, then place an order in another tab. A test order fires the tag too: the browser can’t tell it’s a test.
- Open the purchase’s Browser row: Google Ads reads Sent from the browser, and Payload (redacted) shows the order ID, value and currency. Ad platforms don’t reply to browser sends, and a tag stopped by an ad blocker isn’t listed.
- In Google Ads, check the action under Summary. Until conversions from ad clicks arrive, it reads Awaiting conversions, which Google says is typical for a new action (Google); some accounts show Inactive, and its goal Misconfigured. Google’s freshness table gives 3 hours for last-click conversions, 15 for other attribution models (Google).
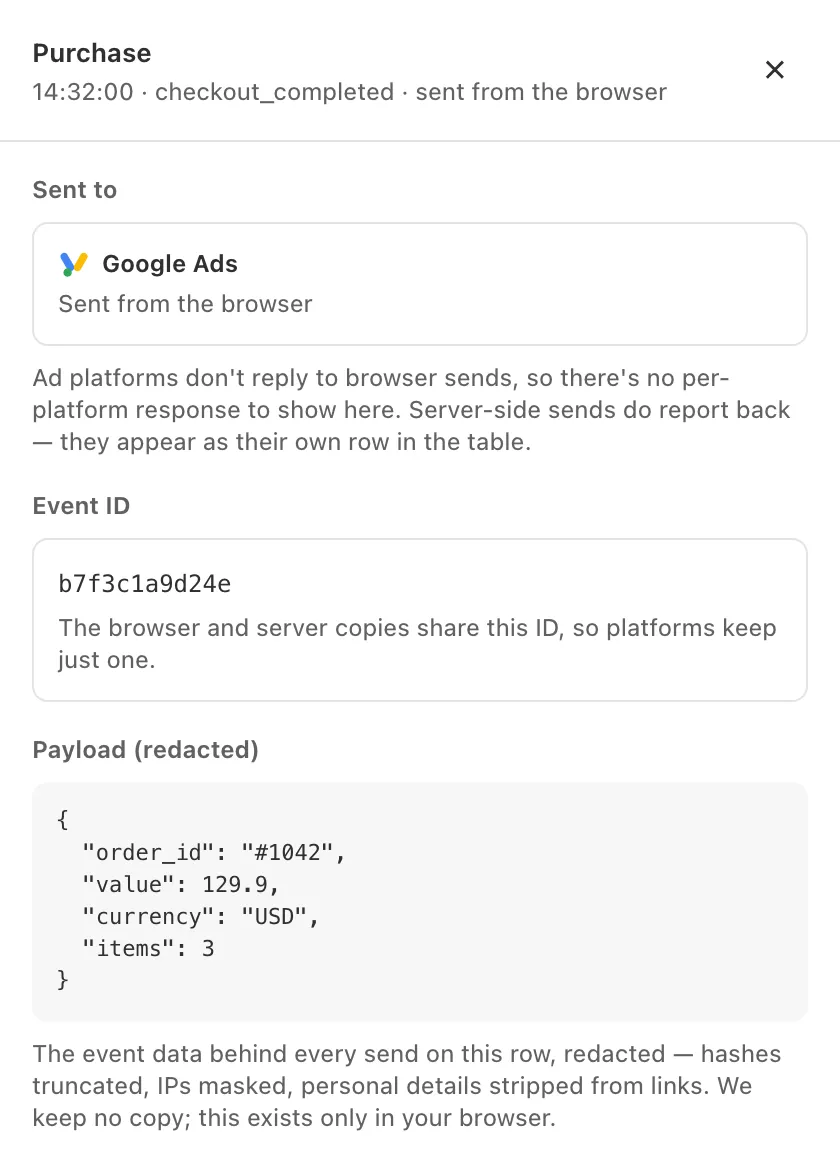
On Destinations, the account reads Browser only, as expected.
What if it doesn’t work?
Start with the purchase’s Browser row in Live, then the two values in Google Ads.
| What you see | What it means | What to do |
|---|---|---|
| cPixel won’t save: “The conversion ID looks like AW- followed by digits…” | The ID lacks its AW- prefix |
Type AW- before the digits |
| “A conversion label is letters, numbers, - and _ with no spaces…” or “That’s longer than a Google Ads conversion label…” | You pasted more than the label | From AW-…/label, keep only the part after the slash |
| No Google Ads on the purchase’s Browser row | Declined marketing cookies, an ad blocker, or the account’s browser sending off or set to Yes | Check Manage Google Ads; a blocked tag can’t be resent |
| Tag fires, nothing in Google Ads after 15 hours | No ad click behind the order, or the label belongs to another action or account | Recheck both values on Use Google Tag Manager; the action must be Purchase, manually with code |
| Each sale counted twice | Another purchase action, such as the Google & YouTube app’s, or a Google tag in your theme | Keep one sender per action |
Remove, in Manage Google Ads, stops cPixel’s tag for that account.
