Connect Pinterest Tag and Conversions API to cPixel
How do I connect Pinterest to cPixel?
Pinterest needs three values in cPixel: the Tag ID, under Conversions, Pinterest tag, Tag manager in Pinterest Ads Manager; your ad account ID, from the address bar in Ads Manager; and a Conversions API access token, from Conversions API, Set up API. cPixel fires the Pinterest tag on your Shopify storefront and sends checkouts and purchases from its servers.
Paste them into cPixel
- In cPixel, open Destinations and click the Pinterest icon under Connect a platform. Set up Pinterest opens on Paste your IDs.
- Fill in Tag ID, Ad account ID and Conversions API access token, all required. The grey hint above them, which says purchases aren’t tracked, predates cPixel’s Pinterest server connection. Name the account under Name this account (optional) if you like.
- Click Test connection: it reads your ad account with the token, confirming access, not delivery.
- Click Continue. On Choose options, keep Send events from the browser and Send events from our servers ticked. Keep No — cPixel handles Pinterest (recommended) unless another tool sends to this tag: despite its label, Yes — keep it, and cPixel stops sending Pinterest server-side stops cPixel’s browser and server sends to it.
- Click Save and continue. Test it confirms Pinterest is connected.
Important: Pinterest’s own Shopify app also installs the tag and the Conversions API (Pinterest), so keep one sender per pixel.
Where do I find my Pinterest Tag ID?
At the top right of Pinterest’s Connect a data source page: about 13 digits, shown before you fill anything in.
In Pinterest Ads Manager, click the menu icon beside Campaign manager at the top left, then Conversions under Manage business.
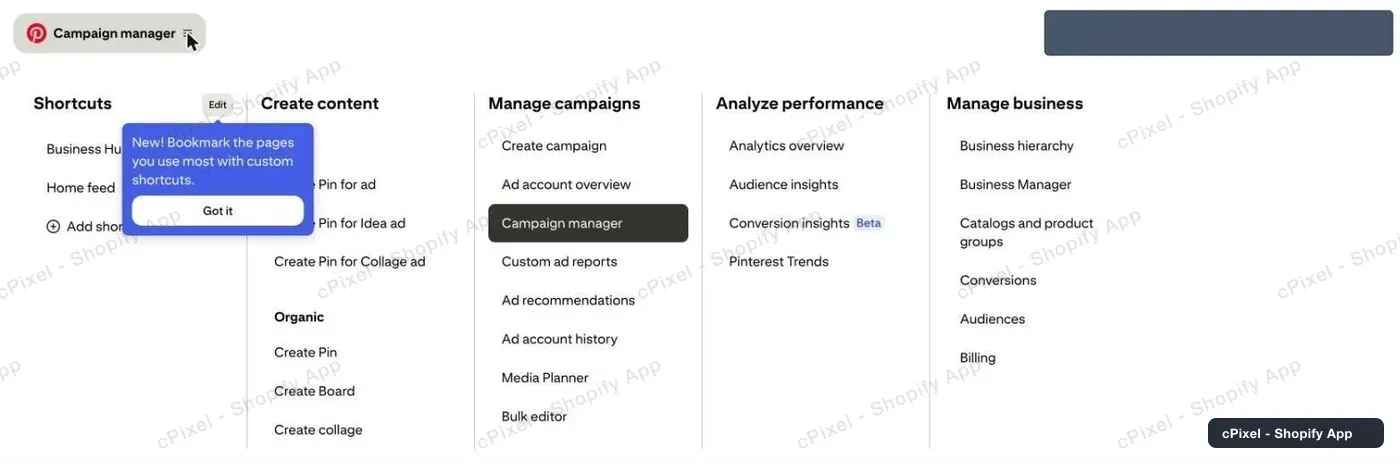
- In the left rail, open Pinterest tag → Tag manager.
With no tag yet, Tag manager shows a promo panel. Click Install the Pinterest tag; it commits you to nothing.
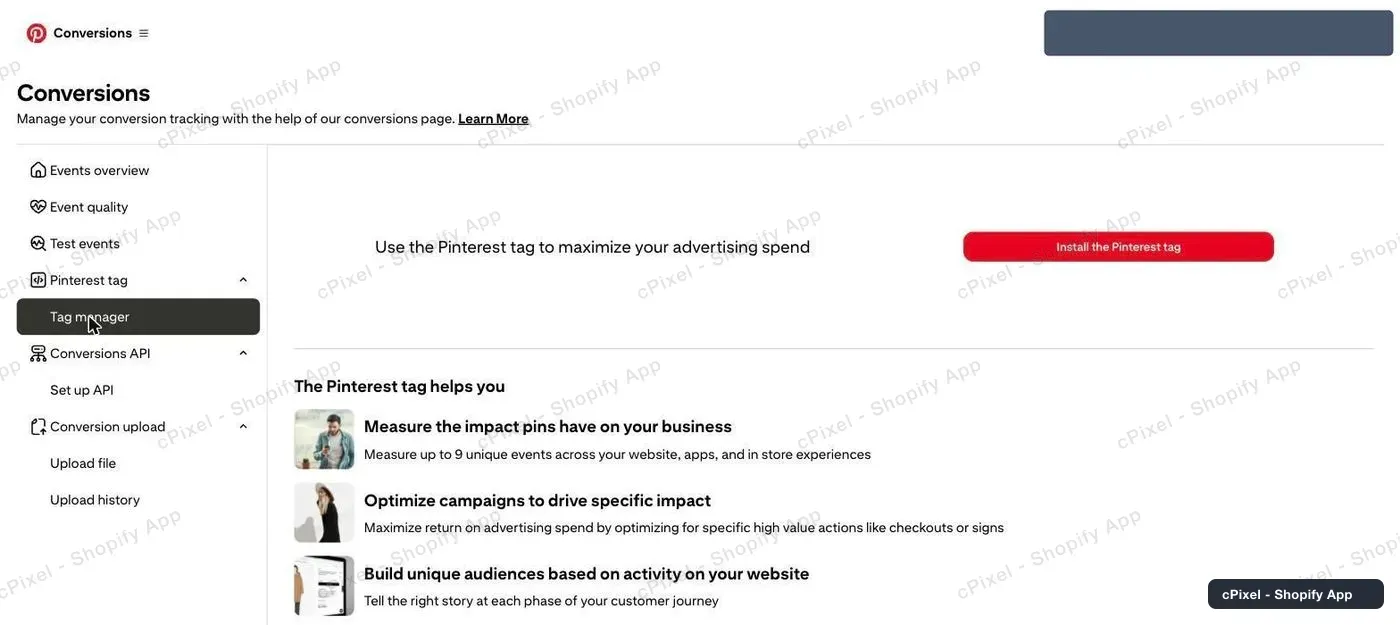
On Connect a data source, copy the Tag ID from the top right into cPixel, then close the page, as cPixel’s app embed installs the tag.

Tip: Tag manager lists a tag only once events arrive, so its promo panel can linger; Install the Pinterest tag still shows your Tag ID.
Which number is my ad account ID?
The number Pinterest shows beside your Conversions API token when you generate it. It’s also in Ads Manager’s address bar and under your ad account’s name in Business Manager.
Important: Three Pinterest numbers look alike. The Tag ID, about 13 digits, is what the storefront tag fires with; the ad account ID is where cPixel’s server sends go; a Pin ID, about 18 digits at the end of a Pin’s address, identifies an image and never records a conversion.
cPixel refuses the Tag ID in the Ad account ID field (“That’s the Tag ID you entered above…”).
How do I get a Conversions API access token?
Generate it under Conversions → Conversions API → Set up API in Pinterest Ads Manager. It’s required: cPixel’s servers send checkouts and purchases with it.
- On the Conversions page, open Conversions API → Set up API.
- Select Conversion access token and click Generate new token.
- Copy the token straight away into cPixel. Pinterest shows your ad account ID beside it.
One token covers several ad accounts under the same Pinterest user (Pinterest). cPixel stores it and never shows it again.
What does cPixel send to Pinterest?
Storefront events from the Pinterest tag, which cPixel’s app embed loads, and checkouts and purchases from cPixel’s servers through the Conversions API; each event goes one way only.
- Page visits and add-to-carts come from the tag, only while the app embed is on. If a browser blocks the tag, cPixel sends that event from its servers.
- Checkouts and purchases come from cPixel’s servers as
initiate_checkoutandcheckout, Pinterest’s purchase event, rebuilt from the Shopify order, since no theme code runs on checkout or the Thank you page.
Server events carry hashed email, phone and Shopify customer ID when known, plus IP address and user agent; Pinterest’s click ID isn’t captured. Pinterest keeps the first event per event ID within 48 hours (Pinterest) and scores your data under Conversions → Event quality (Pinterest), a score cPixel doesn’t read.
Note: cPixel’s Pinterest server connection is new: in production since September 2026, and not yet confirmed on a live ad account. Check your first checkout and purchase in Live.
How do I check it worked?
Watch a checkout and a purchase in cPixel’s Live, where server sends show Pinterest’s reply, then confirm in Pinterest Ads Manager.
- In cPixel, open Live and click Start session.
- Browse your store in another tab and add to cart. Browser rows list Pinterest as Sent from the browser, with no reply: platforms don’t answer browser sends.
- Start a checkout and place a real order; cPixel skips test orders by default. Their Server rows should show Pinterest Accepted.
- In Pinterest, open Conversions → Events overview; a new tag can take up to 24 hours to show.
Destinations marks the account Verified after its first accepted server send, usually the first checkout. Pinterest’s Test events page and Tag Helper extension check the tag alone (Pinterest). Pinterest’s own guide: Track conversions with the Pinterest tag.
What if it doesn’t work?
If Pinterest isn’t receiving cPixel’s events, open the Pinterest row in Live: a send that isn’t Accepted names its cause.
| What you see | What to do |
|---|---|
| Test connection fails | The ad account ID is probably the Tag ID, or the token’s user can’t reach that account |
| Rejected or Error | Read Pinterest’s reply in the row’s details; cPixel retries errors itself |
| Fix Pinterest on Home: the token was rejected, server sends stopped and a critical alert was emailed | Generate a new token, click Fix Pinterest, or Manage beside the account on Destinations, paste it and save |
| No Browser rows name Pinterest | The app embed is off (the Browser badge reads Needs app embed): switch cPixel tracking on and save your theme, again after changing themes |
| A purchase is missing or Skipped | Read its reason, then see purchases not showing |
| Purchases counted twice | Another tool, such as Pinterest’s app or a tag in your theme, sends to this tag |
Remove, in Manage Pinterest, stops sends to that account and deletes its token.
